In an earlier post, I wrote about how I acquired a motorcycle. There were a few things wrong, or left desired… which I intended to address.
This post is a summary of issues and modifications up to today.
Issues found
Need-to-fix:
- Battery: resembling a Norwegian parrot. It was… pining for the fjords. Bereft of life, an ex-battery.
- Left side pannier: One of the latches that is supposed to fall into the actual lock had come off. Rather than into the lock, it fell to the bottom of the pannier, which is where I found it.
The latch itself is sturdy enough; the problem is the plastic base which holds it in place with self-tapping screws; that’s a brittle single point of failure.
Problem is, Honda doesn’t sell replacement lids anymore. As far as they’re concerned, you can close the lid with glue… or maybe roll the bike into a canal, I’m not sure. Being able to close the lid while driving is pretty much essential; I think you’ll be frowned upon, and get questions from authorities, when you ride with the lid open. - Rear brake caliper: I think the rear brake caliper has been living outdoors too long; it needed a revision.
While another NT700-rider who lives close by mentions this as a specific weak point in an article in the Dutch magazine MOTO73, Goedhart Motoren in Bodegraven doesn’t share that opinion. They also know this specific bike, and they know that, apart from it being used all year round, it also spends all of its life, including when it’s not used, outdoors. Since I park it in our garage, and when at work, in the parking facility under the office, I am expecting to see improvement in this area. - Front tire: had to be replaced.
Nice-to-haves:
- Oh dear, how much would I like to have a usable satnav-type solution somewhere in my field of view.
In the car I use the TomTom for Android app on my (rather large-screened) phone. On the bicycle, I have a phone holder mounted on the handlebar, which accepts the same phone. I’d love something similar on the Deauville. - Additional hand protection against foul weather: Honda used to sell so-called knuckle deflectors (part number 08P70-MEW-800), which are supposed to direct cold air and moisture away from your hands. Reports on the various forums say that these actually really work well, and there are users who go as far as to say that they wouldn’t want to do without them.
Unfortunately, Honda discontinued these, and as a result, they are now highly sought-after, and are often sold at top dollar amounts on eBay and the likes. But I was lucky: I found a pair that was never used, fully complete including installation guide) at a very reasonable price, so I snagged these up. - Additional foot protection against foul weather: Admittedly, this seems less urgent than the knuckle deflectors. My (Alpine Stars) boots have proven to be quite waterproof, and also quite warm.
Which is good news, since I have not been able to locate a suitable pair of… foot deflectors? Ah, it’s called an undercowl set. Article number was 08F71-MEW-800. As far as Honda is concerned, these seem to have gone to the same place as the knuckle deflectors (probably to /dev/null), and at a little over 400 euros, this kit was also shockingly expensive.
UPDATE: ok, I need to move this one section up. I found a suitable solution, that has the added advantage of protecting frame tubes, exhausts and other bits from road salt. The suitable solution was a secondhand solution, that cost me less than 50% of the price when new, plus the shipping costs from the UK.
Wanted, but not planned for
- [moved one section up.
 ]
] - LED replacement for H7 lighting
When you rely on one headlamp rather than 2, you’re really counting on the reliability and longevity of that item. If it dies on you on a dark and stormy night, this will adversely affect your sense of well-being.
Problem here is that not all LED H7 replacement solutions will fit in all headlights, and on top of that, there are LED bulbs which give a very sloppy, spotty beam.
Implementation and modifications
The battery was an easy fix. Go to dealership, get new battery, pop it in, charge it, done.
Rear brake caliper was revised when I brought the bike in for a service, which was 1000 or so km overdue when I got it.
Front tire: replaced with a Bridgestone Battlax Sport Touring T32. Expensive? Yes. But my life rides on it (literally).
Left-side pannier lid – that proved to be a bit of a challenge.
I ended up buying two locks from zelfbouwcase.nl, and 8 3mm bolts, washers and nuts to mount them.
As you can see, the closures can also be locked. It is admittedly a puny, el-cheapo lock, and the key is stamped out of sheet metal, but the idea is there. When you close the locks, you can no longer reach the screws, which are covered by the closed closure. There is only one key per lock, but luckily the keys are all the same, so buy two of these and you have a spare key, which you can add to your spare key set.
When figuring out where to mount the stuff, make sure that the closing plate and the mechanism are not placed at a large angle from each other, otherwise the opening and closing will be a matter of elbow grease. In the photo to the right, if you look at the lock on the top, you’ll see which angle I’m talking about; this angle is just about the maximum.
Do yourself a favour and tape the plastic parts that you are going to attack with the drill with painter tape. You can mark the holes on the tape, and it prevents your drill from slipping. Immediately after drilling, take the tape off, otherwise it’ll look funny.
When all the above is said and done, it’s quite a neat solution, and better than duct tape or superglue anyway! 🙂 And I have to say: this is a solution I definitely trust.
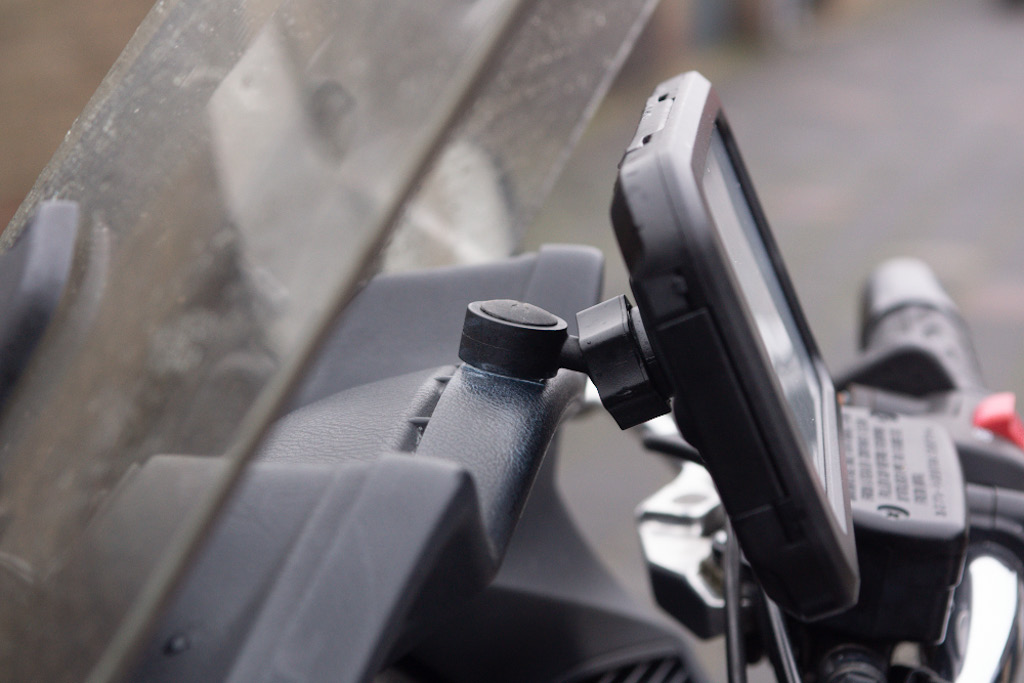
Satnav solution: the Saga Of The Waterproof Phone Holder.
From a drop-shipper, I ordered a “waterproof phone holder for bike, scooter and motorcycle”. I started out mounting the whole shebang on the handlebars, which was only mildly satisfying. In order for it not to cover the instruments, I had to keep the holder under the bar, above the tank. The result was that, in order to see it, you would have to look really down, and thus take even your peripheral vision away from the road ahead. On top of that, positioning is limited, because the holder moves when you move the handlebars.
I ended up picking the bracket apart, mounting only the ballhead to the top of the dash (after filling out the mounting surface with epoxy), judiciously strengthening the construction with plastic construction kit and then glueing the ballhead on using the full 30mm surface area as a glue surface. There is a self-tapping screw involved, but that went in to keep the thing in place as the glue and epoxy was hardening. Said screw is now merely symbolic.
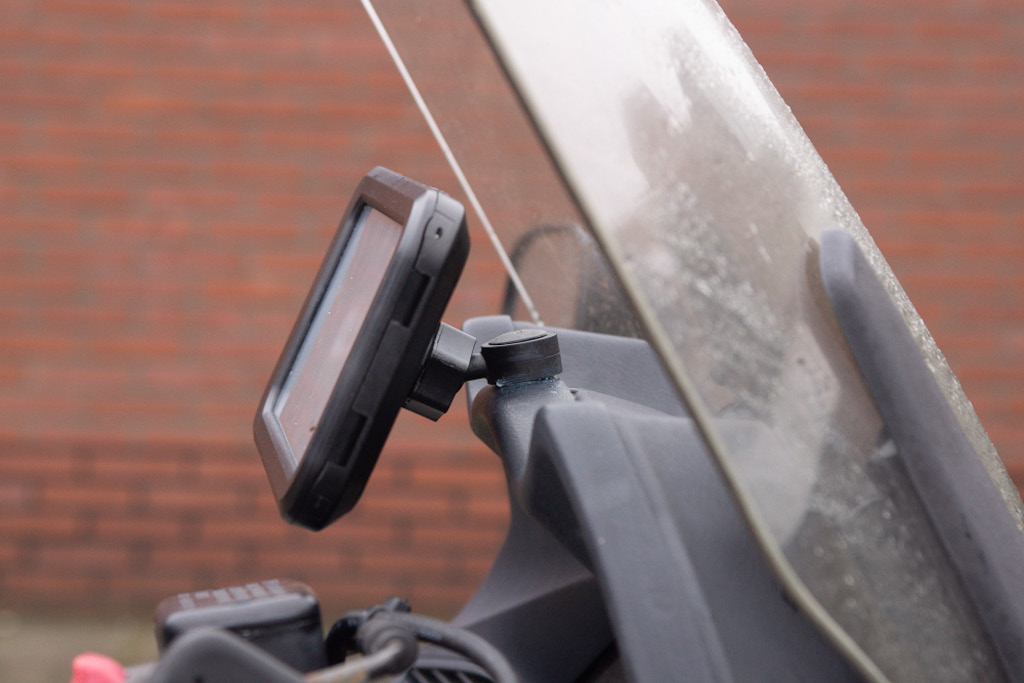
Again, make sure the plastic doesn’t bend. If necessary, make sure the mounting area is reinforced, or you’ll see vibrations which might harm your phone, and things will eventually start to come off.  I also fed a charging cable in (more elbow grease, a little file and some kit). With my Samsung Galaxy A71 and a special angled connector on the USB-C side, it’s a tight fit!
The other end goes into the shortest cigarette-lighter-to-USB transformer plug I could find, which then goes into the 12V-receptor that lives in the left pocket of my fairing.
And on the road, it works like a charm. Rock-solid, well in my peripheral vision when I look at the road, and I can still see all instruments and lights on the dashboard! And nothing on my handlebar (including the brake pot and the heated handlebar grip operation panel) hits the holder or the cable when I twist my handlebars to full lock.
“There’s a special satisfaction when a job turns out just right.” (with apologies to Donald Fagen).
Hand protection: the elusive knuckle deflector kit arrived, and was mounted the same day. 45 minutes of work, including reading the manual, taking the mirrors off, cleaning the surfaces, sticking everything back together, and remounting the mirrors. In my case, the mirror stalks were mounted with Torx screws, so I was happy to have a set of Torx wrenches in the garage. The (slightly longer) bolts supplied with the knuckle deflector kit are 4mm socket head bolts.
Added advantage is that the mirrors, which are already high up and wide apart, become a little bit higher up and slightly wider apart, which increases their already massive usefulness. And after mounting everything, the image in the mirrors is just as vibrationless as it was.
Foot protection:  On Marktplaats (a leading Dutch secondhand site), I found a belly pan that goes under the radiator and existing fairing, effectively turning it into a full fairing. It’s made by P & P Motorcycle Bodyworks Ltd in Dorset, and fit & finish is excellent. I think it’s made out of fibreglass, and it’s quite sturdy.
Mounting it using the supplied instruction looked more intimidating than it was. I had no idea what a threaded clip was, or a nyloc nut, but the folks at P&P Motorcycle Bodyworks were really, really helpful, and even offered to send a nuts & bolts kit free of charge, but with their help I figured out that I had everything I needed, so I told them to not send anything.
If you’re as old as I am, getting this on the bike (just standing on the concrete garage floor on its centre stand) in an unheated garage is slow going, so at a leisurely pace, checking and doublechecking and second-guessing myself, it took me the better part of three hours. I’ll definitely do a writeup of the procedure, with more (and clearer) pictures than in the Xeroxed manual. There will be one in Dutch for the Honda Deauville Club yeah… that’s not gonna happen, since I was unceremoniously kicked out of the Dutch Honda Deauville club after standing up for another member who was treated unfairly, but that’s another story. So I will definitely put one in English up here somewhere sometime.
Does it make the bike look prettier? I would say no, but your mileage may vary. I found that showing part of the power plant and the exhaust pipes made it nicer to look at. But the previous owner found that the belly pan made his bike sportier to look at.
To each their own.
But I am a function-over-form guy, who rides his bike year-round, and the exposure to road salt would probably make the bike look considerably less pretty. So anything that keeps the engine room and the frame downtube and the exhaust pipe behind some rustproof fibreglass, and thus out of the way of road salt, is by definition something that cheers me up. And the benefit of your boots sitting behind wind (and water) deflectors is a bonus that’s not to be ignored.

So… are you done now?
Depends who’s asking. ![]()
If it’s the accountant my wife, the answer is, of course, a resounding yes. All in all, I’ve now spent considerably more than I expected, or intended, to spend. Part (in fact, most) of that was “unforeseen”, and part of that was because I discovered something would be a Good Idea™.
But one can never tell for sure…
I might want to do something about lighting. The H7 solution will be merely a replacement, but I might hit upon a set of LED driving lights to be mounted under the tip-over wings on the side of the fairing, just to make sure that, when my H7 dipped beam fails, I can still be seen by other traffic.
Otheus 2022-07-18
Nice writeup. I had installed auxiliary LED strips as break lights, running along either side of the license plate holder. If you have a top case, I view this as far kore important than headlamps. Ive had two headlights go out on me, over 160kkm of driving like you all weather and year round. But because its highly unlikely both will go out at same time, you can get by with the redundancy of the highbeam. Replacing them isnt easy, and it’s clear that little room exists to install LEDs with heatsinks or a fan. I have yet to see someone who certified their led h7s for this bike specifically. Let me know if you find a solution.
Speaking of lights, i use the Helmet mounted break- light by ‘brake-free’’ kickstarter project. Very happy with it after a year. It activates on deceleration, great for engine braking downhill.
Now for my question: how do you safely and effectively drill into the case? Where do you get the grommets to match?