Ever seen the dual-layer DVD with the card updates (which can be read correctly in another drive) being refused by your RNS 510 (Columbus) as an unreadable disk?
You wouldn’t be the first to whom this happens. It seems a common issue that the laser, probably due to contamination, has no problems with CDs or even single-layer DVDs, but that it finds a dual layer DVD too difficult to read. Or you are the kind of person who (like me) does not use that CD player because all music is on the hard disk or an SD card, and so you’ve never even noticed it.
How now, brown cow?
I had read about how to do the map updates on the RNS 510 via an SD card. There were also people who did not manage to get that to work, but I thought, I understand a little about ICT… let’s see how far I get.
Well … yay me, I got it to work. Below, you’ll find the how-to, peppered with some screen shots and other illustrations.
But first, a word from our legal department. ![]()
Disclaimer:
Dear reader,
I am very sorry to be rude to you so early in our relationship. But what with us living in a society where people can successfully sue fast-food restaurants for serving hot beverages at the proper temperature, my lawyer insists that I insult your intelligence before we proceed.
I’ve done everything within my powers to make the procedure described below behave socially. I have even tested the procedure on my own Skoda Octavia 2 Facelift, equipped with an RNS-510 Columbus with firmware version 3984. I can tell you that following them properly will not format your C:-drive, but I cannot accept responsibility for it to not function in your specific environment.
If, as a result of you using the software, Bad Things happen, causing your car to grind to a halt, your wife to divorce you and taking the kids with her to her mother in Miami, your mistress to dump you in favour of her tennis coach, your garage to be set on fire, which in turn reduces your Volkswagen/Škoda/Seat/Audi to a heap of shrapnel and kills your neighbour’s mother-in-law, and I hear about it, I will feel very, very sorry for you.
If it’s a Škoda, I will feel even more sorry for you.
But that’s about it.
If you’ve been sufficiently insulted by this here disclaimer, please forgive me, and let’s see if we can make our relationship work.
Ingredients:
I am assuming Windows 10 because that is what I use, and the most important tool you will use is, as far as I know, only available on Windows.
The first step is to ensure that you have a so-called “ISO image” of the DVD with the card updates on it. There are different ways to make an ISO image. For this I use a simple CD / DVD tool called CDBurnerXP (which, despite the name, works fine on Windows 10). Piece of cake: read the disc with the updates, and save an image as an ISO file.
You also need an SD card with a capacity of at least 8 GB, because you are going to use approximately six. The card needs to be formatted with file system FAT32 … so yes, whatever is on it, you’re going to have to backup. Or lose.
You also need an empty writable CD, and a program to make a CD which Columbus can actually use. Conveniently, that is the same CDBurnXP tool.
The last thing you need, and this is crucial, is Maps Tool version 2.0.2, a tool to create the structure for the SD card. That is also the most difficult to get, since the program is no longer maintained by its creator. The latest version is 2.1.3, but it refuses to accept card version 8515. The older version, 2.0.2, does that perfectly. At the time of writing I downloaded it from here.
Step 1: Create the ISO file
Start CDBurnerXP, and from the opening screen, select Copy or grab disc

Now, for the source, point at the drive containing the source disc (your update disc), and for the target, select “Hard disk” and enter a target path and file name.

Once you’ve done that, hit “Copy disc”, and wait until it’s done.
Step 2: Prepare the SD card
I did tell you that you ARE going to lose whatever is on the SD card, so I hope you either backed it up, or you don’t care about what’s on it.
Insert your SD card in a card reader. Open a Windows Explorer, expand “My Computer” and select the drive letter for the card (make sure you’ve got the proper one). Right-click it and select “Format”. In the “File system” dropdown, make sure that “FAT32” is selected. Leave the cluser size to 32 kilobytes, and hit the “Start” button.
Excuse my Dutch… your dialog will have everything in the same places. You’ll work it out…

Step 3: Create the startup CD and the content of the SD card
The Maps tool I mentioned above will do that for you.
Start it.

In Source, select the ISO file you created in step 1.
In Target, specify a folder where you want the result of the build to appear. You are going to copy the relevant stuff to the SDHC card later on, so just pick a folder on your local hard disk here.
Make sure you’ve got “Prepare maps to be copied from SD card” selected. Don’t bother to try to “Compress maps…”. It will not work. It’s too big.
When that’s done, hit the Build button and sit back and relax. It’ll tell you when it’s done.
When that’s done, your destination folder will look like this:

Step 4: prepare media
Copy the two folders (MAPS and MAPSDVD) and the test.mp3 file to your freshly formatted SD card.
Now, start up CDBurnXP.
From the startup screen, select “Burn ISO image”

In the next dialog, browse to the ISO file in the folder where you told Maps Tool to put its build output… here, remember?

There are two things in the next CDBurnerXP screen I’d like to draw your attention to.
First, the burn speed. Depending on the quality of the CD writer in your computer, the quality of the writable CD you are using, and the condition of the laser reader in your Columbus, it may make sense to use as low a burn speed as possible. Since we’re only going to write something like 4 MB to the CD, setting this to 1x doesn’t hurt. It’ll be done in a matter of minutes.

Second, and more importantly, the “Finalize disc” check box. You need to make sure this is checked. If it isn’t, your Columbus will spit out the CD telling you it’s unusable. This is the reason why I used CDBurnXP, rather than use the native Windows facility to burn a disc from an ISO image, to create this disc.
When you’ve got that sorted, insert a pristine writable CD in your drive and hit “Burn disc”.
We are now ready to collect our goodies — the CD and the SD card, and the key to unlock your car.
Step 5: Perform the update
The only reason you took your car key with you is to unlock the car. We’re not, repeat, not, going to use it during the procedure. Your battery should easily be able to sustain the use of the head unit for half an hour, even on a cold day. If it isn’t, you may want to make sure you’ve got a battery charger, or jump start cables and a friendly neighbour with a car. Or even better, you may want to get a decent battery.
In the car, power on the unit, and make sure it can access the SD card properly. If you can play the Test.MP3 file, which is a boringly authoritative German voice assuring us that Volkswagen is “das Auto”, in a way that seems to urge you to salute and click your heels*, you’re good.
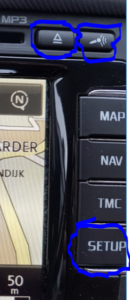
Restart the unit in Software Upgrade Mode, by pressing the SETUP + EJECT + Microfone/Info button simultaneously (the buttons in the picture below).
The screen will go dark. Insert the CD you prepared in Step 4, and wait. The system will come up with the Welcome screen, and then a screen that states that the system is starting.
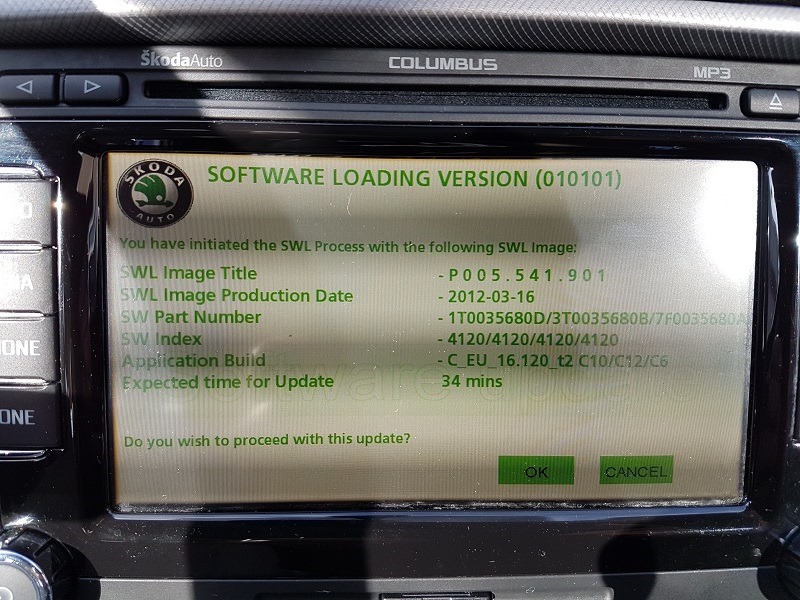
If your CD is OK, you will, after some time, see a screen like this:

… and then, after some time, a screen that asks you to confirm that you want to proceed with the upgrade.

You do, trust me. Hit OK on the touch screen. It will then show you a screen informing you about the progress. Ironically, this will start out at 31% – and that percentage Will Not Change.
A watched pot never boils. Go indoors, have a cup of coffee.
Remember how I said “Ironically” in the previous paragraph? It is ironic because in my case, it took the process 31 minutes to complete.
Get back into your car after 31 minutes or more… what you should see is this:

The CD has been ejected, and the unit succeeds in making the number 010401 sound triumphant.
Remove the CD, allow the system to restart, and then, when it has, press the SETUP button and hold it down until you get the hidden setup menu (FM/AM/Version). Select the last option, scroll down, and lo and behold, you should now see the version you just updated to:

Happy navigating!
* If you are German and you are reading this, I apologise profusely… but that is how it sounds.
rene 2022-07-05
great !!
easy to follow. it works!
tnx
admin 2022-07-05 — Post Author
Glad to hear that!
Ken 2025-09-17
Can the same process be done on a VW Touran 2012 with RNS510? Thanks
admin 2025-09-17 — Post Author
One would assume so… but I don’t know if some RNS510’s are more equal than others. 😉
I would assume that, when you can actually initiate the setup (Step 5), you should be good — apparently, the firmware allows you to process the update.
But mind the disclaimer at the top, ok?
Let me know how you got on!